|
Forums >
Digital Art and Retouching >
What would you do next?
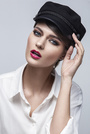
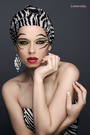
Hi folks, Im attempting to get into the more in-depth side of retouching my own photos. I have this one photo i'm trying to fully polish up as a start. Before and after photos below. Basically, so far, I have: - removed skin blemishes (but left in the model-identifying birthmark at top of head. good yes/no?) - removed dress annoyances - fixed a bit of the odd hair - removed some hair flyaways - tweaked the eye reflections so... what would you do next? Not asking anyone to spend any editing time on this: just looking for verbal suggestions. (btw: you should be able to click on the pics and get a higer res version, that can then be mouse-scroll zoomed) Before:  After:  Jul 13 18 11:07 am Link I dunno... maybe remove the strands of hair on her face? Jul 13 18 02:05 pm Link i would either adjust her right arm or make sure you crop the bottom edge up to the break. it looks like she is double jointed or it may be broken. not a good line but the crop makes it an easy fix. and i would completely remove the left arm by filling in the background so you have a clean line down the side of the dress which should enhance her figure. Jul 13 18 08:37 pm Link Fashion Figure Fantasy wrote: Ah, good points, thanks. Jul 13 18 10:25 pm Link If it were me, at minimum regardless if submitting, I'd cleanup some stuff from her face: --someone else mentioned strands of hair on her face --dodge down the mole on her forehead. Just lighten it a little. --dodge down the bags on the right side. --dodge down the heavy shadow underneath her right cheek. --dodge some of those dirt looking dark spots on her right cheek and jaw. --on her left cheek and jaw, smooth the transition. Mostly by dodging. Her neck: --dodge the dark marks and maybe reduce the redness. Looks like someone had their hands around her neck. Haha, not saying someone did. Chest: --burn the center. Looks like she's got the inverse Bat signal on her chest. --kinda like her jaw, there's some "dirt" looking spots around the whole chest/clavicle area. Just dodge 'em. --burn her right breast so it transitions smoother to her chest and clavicle. Looks like a bright triangle. Notes: --Dodge = brighten --Burn = darken --Don't just blindly dodge/burn. One of the key points in d&b is to smooth out the transitions. Jul 14 18 01:32 pm Link Black Z Eddie wrote: interestingly, I think the redness is actually due to C1 auto skin boosting. Jul 14 18 02:34 pm Link I would Liquify to give better shape ( left shoulder ) make it so the dress looks like it fits better ( again this could be done with LQ ) do more skin work with her face and chest area, especially around her cheeks, get rid of loose strands of hair on her face, soften the birthmark, and on her right eyebrows it looks like there some light reflected on it I would darken it so It doesn't look like she's got a bald patch, also darken her hairline ( where her hair parts ) Jul 19 18 05:31 am Link hi , this tutorial will help you , one of the best retouchers https://www.youtube.com/watch?v=fHVUrs8ssLc Nov 04 18 07:44 am Link Darken the background put vignette increase overall contrast, the image is "pale and anemic", needs a contrast boost Sharpen at least one or twice with different radii, again, image looks too soft to be "published". Clone out the left arm piece showing, it is so easy, just replace with a bit of background that is adjacent, literally 12 seconds, LOL Nov 30 18 05:03 am Link Dec 05 18 02:28 am Link Dec 11 18 12:36 am Link I didn't read all the other responses so this may have been mentioned already. Her eyes are blurry in the second shot and crisp in the original. I am guessing you applied some sort of blur to soften the skin? If so, you should mask the effect so it doesn't blur the eyes, lips, jewelry, etc. If you didn't intentionally add a blur, then maybe you did something in resizing and exporting the finished photo that is affecting the final output sharpness. Dec 12 18 11:59 am Link >> - removed skin blemishes (but left in the model-identifying birthmark at top of head. good yes/no?) If the photo is for a model or a portrait client, most likely yes. Ask the model or the client. If it’s for a celebrity who has a commonly recognized birth mark), the answer will virtually always be Yes. If the photo is for another type of client, ask the client. If the client is a beauty products company, they’ll want the birthmark removed. I agree with everything that has been said so far. The skin color looks a bit off – a bit too yellow on the left (camera left, not the model’s left) side and a bit reddish on the right side. Also (partly because placement of the main light, the overly lit area of the model’s chest is a bit large, and I find it distracting. In fact, her chest is brighter than her face. It looks like the light was aimed at her chest, not her face. The eye goes to the lightest area of the image (her chest), the brightest color in the image (the dress), and/or the area with the highest lighting contrast (the rather abrupt edge transfer area on her chest). Everything seems to be pulling the eye down to the bottom half of the photo. The fact that the model’s hair is black where it’s next to the model’s face and brown around her chest (lighter at chest level), which confirms that the light was aimed at her chest level. Speaking of the lighting, the light appears to be at approximately the same level as the model’s face (but aimed downward). Generally, the face is lit best when the main light is at a 45-degree (vertically) above the face. That means that, if the light is 3 feet (horizontally) from the model’s face, the center of the light source should be about three feet higher than her face as well. If you had placed the light at a 45-degree to the model and aimed it down at her face, her face would be brighter than her chest (placing the emphasis on her face, rather than her chest), because her chest (being farther from the light) would be somewhat darker than her face. Personally, in this situation, with the model facing toward camera right, I would have placed the main light at camera right – especially since, with the light at camera left, her hair casts a shadow across the left (camera left) side of her face and chest. Placing the camera at camera right (preferably right in the direction where the model was looking, or even farther around to the right than that) would have helped to light the face with the same light, which should have eliminated the yellowness on one side and the redness on the other side – which would have made adjusting the skin tones MUCH easier in Photoshop. Also, with the light aimed down at the model at about a 45-degree angle, the top of her breasts would have been slightly lighter than the area just below, emphasizing the shape of her breasts – without making them the center of attention (and eliminating that cone-shaped highlight on her chest). I also noticed (as did the previous poster) that the finished photo looks less sharp than the unretouched version. If you blurred the skin, a black mask over the hair, eyes and dress would have made the photo look sharp and concealed to some extent any blurring of the face. Even without the blurring (or whatever caused the unsharpness), a little sharpening of the non-skin areas would have been helpful. (Generally, when you sharpen, which should be the last step before cropping, you do not want to sharpen the skin.) One thing about removing stray hairs on the face… Generally you should move any single hairs that cross the face (or the eyes). However, if there are clusters of hairs on the face, it’s difficult (if not impossible) to remove all of them without having places where a hair begins, disappears, and then reappears again after a gap. Plus, when you use the healing brush to remove a single hair or two, it does not affect the color of the skin. However, where you remove a bunch of hairs clustered together, it will change the color of the skin (usually making it darker as well) in that immediate area. Jan 11 19 04:23 am Link |


 I'm just trying to develop an eye for what is expected)