|
Forums >
Digital Art and Retouching >
Photo processing
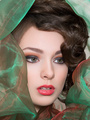
 How to achieve this color treatment ?? Jun 24 17 03:50 am Link May seem an obvious question and is, what is your starting point? Other than that examine the colours, lots of blue/teal and sand/buff present. Jun 24 17 06:55 am Link Pretty sure this is a composite. He did a motion blur on the background which is why it looks like almost like it was a dragged shutter with the camera sliding forward or backward. If you can zoom in on the image it looks like she might have been cut out so the toning could be that the city was exposed on the cooler side and the model because she was lit by Flash is a bit warmer. Jun 26 17 04:37 pm Link Definitely not a composite. It's just the frame was extended by stretching BG. You can see the before in this video: https://www.youtube.com/watch?v=IrqCy2WqOqw Jun 26 17 05:01 pm Link The color elements of this image (if that is what you are after) are often done using a color adjustment layer...and the clear transparent coloring is painted on exactly where it is wanted and however strong you like it to be. You can use a curves or levels adjustment layer. Adjustment layers are located on the very bottom of the Layers pallet and are under the 1/2 moon icon. Go there and choose a curves or levels adjustment layer. Adjustment layers are always beautifully transparent and they dont clog up the picture because they are clear and transparent. So go to the curve or levels properties box and drag the center and drag it up or down or left or right depending. Yu will see the picture getting globally lighter or darker. To get your teal effect: Go to the red channel and drag the channel center slider so you see the teal appear all over your image. You can also then use the blue channel and add in some blue color to make it whatever intensity of color you want. All adjustment layers come with a white mask added. Do a command or control "I" to invert the mask to a black mask. Your global teal color will disappear. Now take a white brush and select the mask and paint on the picture. Where ever you paint will be the transparent teal coloring. If you paint with a white brush it will reveal the teal color...if you paint with a black brush on the mask...then the teal will be removed in that spot. If you are interested in the columns or building colors as well...then simply make up a new color correction adjustment layer that looks yellowish...this comes using the blue slider...the opposite of blue is yellow... you may also want to add in some red to the yellow and make the color a bit orange. Use your white brush to place the effect and its intensity anywhere you want. You can always go back and change the painting of the color, you can use the opacity slider on the layer to adjust the intensity of the color interactively at any time. Hope this helps. Best of Luck! Jun 26 17 06:52 pm Link |