|
Forums >
Digital Art and Retouching >
Achieve the faded tonal look
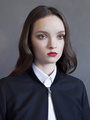
Hi all, There's a photographer I've seen for a while now and I absolutely love the tones she uses in her work, but can't quite put my finger on how its done. Obviously I know a lot of it depends on the lighting of the original image, but she consistently manages to achieve a tone in her images that gives her a 'style'. Heres a link to her website: http://www.chloeannecharnock.com I've had a play on Photoshop with Solid Colour layers, and blending modes. And even gone into curves and tried a more 'matte' effect, but still can't manage to quite nail the look. Any advice on what retouching techniques she could have used? Thanks, Sophie Mar 21 17 03:50 am Link Sophie A Photographer wrote: There are different looks on that site. On some of them the light neutrals are yellowish, on others they are moved to cyan. The outdoor shots have lifted blacks. There are monochrome images too. Mar 21 17 04:36 am Link Agreeing with Anchev about a lot of different look son the site, but simply put if you clip the tonal range so there's no absolute white or absolute black that may get you closer to the look! Mar 21 17 08:00 am Link anchev wrote: Thanks a lot for this Anchev that's much appreciated. I'm doing a shoot tomorrow so will send over some shots for you to play with. Mar 24 17 03:02 am Link Cassandra Panek wrote: Yeah, that makes a lot of sense. I've noticed it looks a lot more cinematic than other shots I've seen. Thanks for the advice 😊 Mar 24 17 03:03 am Link This is a somewhat long-ish tutorial kind of a reply with some very specific Photoshop details included. If you dont like to read too much - feel free to skip by this! In order to get the final quality of the images you link to - there are a lot of steps and details that go into the image that we cant readily see or appreciate easily. Some of the very important visual elements can only happen in front of the camera, and other important details have to happen inside of the camera, and then after the shoot - many steps are usually added in later to fine tune the images in post production. Some pre-production details that contribute to the looks: There are some elements in your linked images that seem to have been accounted for even before the first image was taken. They are critical pre-production details that effect the final image in a very strong way. For example: Many of the models seem to be agency / editorial quality because of their posing and magazine-like visual attitudes. No awkward or newbe amateurs seem to have been used in this commercial quality portfolio. All of the models seem to have had a natural / tosseled hair stylist and a makeup artist available on site to make sure that these very important visual elements were of a good grade in front of the camera. All of the models seem to have that "attended to" look we see in quality projects or magazines. The poses, the makeup, the controlled yet tossed hair, and the wardrobes, and the lights, and the studio environment all seem to have exhibited some kind of purposeful, near professional attention in front of the camera as it was being shot. From a makeup perspective: Im noticing that there is often some oil applied to the faces (cheeks especially) or bodies or arms to create that shiny reflected sculpted look. I notice that many models have makeup that is contoured (the blushed cheeks, darkened jawlines and highlights and shadows applied some through makeup). The hair styles are very tossed and flyaway but "all nicely controlled" at the edges. Some of the images try to create the impression that no attention to detail was involved. I dont buy that, I think it was purposeful and planned to have just that kind of look. The disheveled, minimalist, shiny, contoured, orange/yellow look is fairly popular today in magazines I currently read. I also think that some makeup enhancement / modification was used to get that shiny, chiselled, contoured, gold, orange colored, waxy oiled looks on the cheeks, arms and bodies. From a camera perspective: Obviously a high resolution camera to get and retain the extreme detail and resolution (no Cannon eos rebel 14mp and kit lenses here). There may be some lighting color temperature modification with gels on the lights, or custom white balances used to enhance the gold, copper, or tanned color skin looks. I also notice that a "beauty dish look" was used in the lighting to get the contrasty, visual pop and almost no, or very sharp shadows. Maybe even an art director or even a wardrobe kind of influence to the look and mood of the shoots. From a Photoshop perspective: After you have a lot of the "in front of the camera stuff" done right and well... there are some finishing details that can be enhanced in photoshop to produce the final image vision or POP. You can make or buy pre-made presets to "change the absolutely pure perfect skin tones normally captured" to another color like yellow or gold or orange or blue or cross color presets that make the skin have yellow highlights and blue low contrast shadow details for example. There are some software preset web sites and products that offer these kinds of looks in a collection or a style of presets: ( https://presetpro.com, http://www.fashionactions.com/, https://sleeklens.com and many, many others. Search for "Photoshop or Lightroom Fashion Presets" for example). Here is a conceptual tutorial you can follow when working in Photoshop to get some of these newer fashion kind of looks. These adjustments are totally changeable and controlable interactively until you achieve the look you have in mind. For maximum clarity and controllability you can use the totally clean, clear, and transparent curve or levels adjustment layers in Photoshop to create the mood and look you are after in these images. By using "adjustment layers" you make your art interactive and you get to position the effects "selectively" anywhere within the picture you want, and you can also control the intensity of each effect precisely by changing the opacity of the brush, by the degree of painting on the mask, or the opacity strength on the layer itself. Sometimes the looks we want to create are subtle, so by using adjustment layers we can precisely control the artistic application. To begin: Start out with a basic levels adjustment layer above your base image. Its found down at the bottom of the layers pallet by clicking on the icon that looks like a round half moon. Slide the center adjustment slider to the left some to brighten the overall image and to especially brighten the tones underneath the skin and in the shadows.. You can also slide the center slider to the right to darken the underlying tones in the colors and the skin tones globally across the whole image. Later on we will change the white layer mask to black so that we can stop it from being applied to the whole image, and have it apply to just ONLY specific areas in the image we want to be affected. This center slider RGB adjustment is great for darkening the skin tones or raising the brightness of skin tones. To do some color correction too: By clicking on the RGB pulldown in the center of the levels properties panel we can change our levels in the red, green, or blue channels too at the same time or separately if we are after a color correction effect. You can pull down on the RGB pulldown and select the red channel only. You can now interactively slide the Red Channel center slider left or right to warm up or cool down the tones of the skin with complete artistic controlability on a global basis. You can change the "perfect color skin tones that you normally capture" to globally become something very different like the darkish orange or gold looks we see in your examples. You can do this by first sliding the Blue Channel center slider to the right to create a yellow global cast. If you want to make the yellow to become golden then you would go to the Red Channel and slide the center slider left to warm up the yellow to become gold. If you want that new orange look you would go into the Green Channel and slide the center Green slider right to add magenta to the color mix. This gives you a kind of orange or tanned look. It may need lightening or darkening to suit your artistic taste. To darken the gold/orange color go back to the RGB Channel Selection and drag the central RGB slider there to the right to darken the orange color or to the left to lighten the orange color. You can also do the same kinds of things with "the curves adjustment layers" but I would cover that some other time. All of these adjustments seem to affect the whole picture! UUGH! Maybe that is OK sometimes. But, wouldnt it be great, if you could turn off the global effect and just be able to paint selectively and have that color correction be applied to ONLY to certain areas like the arms or torso of the body ONLY?? Now comes the absolutely great creative power. Here is where the retouching magic occurs: Each adjustment layer that you create by going to the bottom of the Layers Pallet and choosing that "Round Half Moon Icon" comes automatically with a white layer mask attached to it. A white layer mask means that the corrections you were making apply to the whole image! B U T, if you select the mask by clicking on it and hit " Command or Control I " then you can INVERT that mask into becoming a black mask. Now the artistic and creative magic happens! That black mask is called a "Hide All" mask or a Retouchers mask by some. It hides all of the great global adjustments you just made!!! They all disappear and go away and your original image re-appears. Its not a waste, now you will be able to SELECTIVELY and CREATIVELY apply your color corrections to any part of the image. If you choose a soft, white brush with about 10% opacity - NOW you can click on the mask and then paint on the picture. Where ever you paint with a low opacity white brush on the image NOW becomes orange skin, or darker skin, or more beautifully contrasty skin. If you click, and click again, on the same spot, or click and hold and drag - then you can increase the intensity of the effect you created at that spot!! So NOW, you can selectively paint in lightness or darkness cleanly and non-destructively on any part of the picture. You can selectively paint in hot dark orange skin on just the face and chest but not on the hair of your model. And, the more you paint on that spot - the more intense the effect becomes. If you over do it, change your brush back to a black brush and then erase the effect you just messed up on. Now you can create all kinds of modern visual effects and selectively paint them any where you want in the image and however strong you want it to be. You can do two or three such layers to create stronger visual effects. Since they are clean and transparent it doesnt matter how many individual control layers you create. Some people like to create a new adjustment layer for every part of an effect so they have TOTAL artistic and visual control of how these adjustments work and blend together. Dont forget to use the opacity slider on each layer itself to precisely control how much of an effect you see. Use blend modes on a layer too for extra punch. There are OTHER post production layers that are very powerful: There are other adjustment layer effects that you can also Choose and Completely Control such as Curves, or Hue/Saturation/Brightness, Brightness and Contrast, Color Correction, Exposure etc, etc. Its your job to look at and to play around and experiment with each of these powerful "visual game changers" to see how you can make your own images POP off the Page! A master photographer and post processor is well versed in about 18 different disciplines! So your "final creative image" and final look is made up of good "in front of camera" smarts and artistry and craftsmanship - and also the final touches that you interactively make and control with (black) masked adjustment layers in post production. You are the final artist. But be aware that you may have to learn and begin to control from 10-18 different steps of craftsmanship both before and after the camera. You have to learn and develop artistry, and mastery, and creativity, and final vision. You have to learn lighting, posing, model direction, background choices, camera operation, and finally Photoshop in Post production for example. Good images are usually "CRAFTED" to produce the final effects the artist or art director is after. "Good mistakes" or "shoot and pray" efforts sometimes produce a lower number of great images. Practice, experiment, constantly learn, take risks, try new things, read up, take quality hands-on seminars to "upgrade your visual game" !! Every shoot you do will bring you something NEW to improve upon the next time, so dont hardly ever feel disappointed about something that went wrong this time. Be a life-long learner. PS: Hey Sophie, I took a look at your portfolio After I wrote this. Seems like you are already well on your way to becoming a "Quality" Artist and Craftsperson. I like that you seem to approach a photo shoot already like a professional magazine editorial photographer even at age 20!!! Your port bio shows that you know of and enjoy many of the quality steps involved. Nice Going! I wish you Gods Speed in developing and growing even further in your art and craft. It is totally fun and challenging. I feel good things about your development! Brilliant Start. Mar 24 17 10:12 am Link click on the website link you provided third button on left CONTACT open up message send them a note why not ask the person whose work you admire for some hints? May 24 17 11:10 pm Link DSP_Productions wrote: Haha no one would give him free advise or tutorial how they do the retouching so he can copy them that's why he is asking for advise here! May 28 17 02:42 am Link Atanas T wrote: Sometimes all it's needed is a simple two word reply, ie "frequency separation" or "dodge & burn". No more is needed May 28 17 03:10 am Link Atanas T wrote: Ad Alex wrote: I got it even simplier for you just one word-Photoshop. May 28 17 01:39 pm Link Cassandra Panek wrote: Does that mean/make Film look? May 29 17 05:00 am Link If you took ONE of her images and chose ONE element from that image, you might be able to analyse that in isolation. But you just can't even start to take this sort of thing apart and hope to be able to reconstruct anything close to it. The reason it is so good is because EVERYTHING works, everything interacts. She is a master at what she does. It's true that you can learn a lot through analysing and deconstructing images, but sometimes it's best just to enjoy them, take them in, let them affect you and then let them go. May 29 17 06:13 am Link |