|
Forums >
Digital Art and Retouching >
How to achive this sexy Magazine style tone
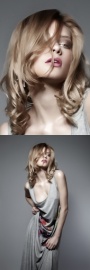
Hi guys i have always wonder how this tones are achieved. I do know most are with direct flash and harsh lighting but wonder how the skin and overall look and vividness is achieved. A bit vintage, analog style. Anyone to shed more light. https://www.instagram.com/milianeyes/ https://www.instagram.com/ohrangutang/?hl=en Feb 05 17 01:06 pm Link I'd say there's nothing there you couldn't do with on-camera flash and something like VSCO Film (maybe even the VSCO iPhone app). Some photographers get on better using point-and-shoot cameras, like the Canon Powershot series, because you often want the flash really close to the lens .. I use a flash bracket and side-mount with my DSLR .. Some photographers use really top-end cameras, but mount a really small flash (like a Contax) so it'll sit low on the shoe .. Takes care of 90% of your skin-smoothing needs too, as the light glosses over bumps and makes skin super smooth (I'd rarely touch those shots with dodge and burn or freq. sep). I always find the main creative decision is how you mix ambient light with flash. I know photographers who find it much harder (technically) than shooting with 5x Profoto heads ... Otherwise, retouching wise, you could start raising the black point a little with Curves, then try pulling the reds up a little in the mid-tones. Simplicity's what makes the style work. Gets you back to "proper" photography. Feb 05 17 01:40 pm Link Photoshop Actions --- scroll through what this search link locates - many before and after examples http://www.deviantart.com/browse/all/?s … p;offset=0 Feb 08 17 12:00 am Link When it comes to an overall look in terms of retouching.....What stands out to me is how the shadows are greyed a little, which obviously affects the tones of the skin and such. This is done by adjusting the RBG of Curves. Or add a colour layer over your work with a very low opacity. Feb 08 17 12:19 am Link Dayo Awe wrote: These 2 links show hundreds of photos which are with different color look and lighting and there is no info what your input image looks like. I don't know what sex has to do with color but in any case nobody can possibly give a valid answer that can would cover all the cases. That is surely not a question of a preset that can be purchased and applied as a one-click solution. You need to check your actual input image and see how exactly its tones must be manipulated to match the target look you are aiming at. Feb 08 17 02:14 am Link There are several images in the first link... that definitely show an orange cast in the darker tones... especially heightened at the edges of the arms, legs, or neck area. To get this reddish / orange tone onto a similar kind of image...you can use a curves adjustment layer with a black layer mask on the layer. For the curves part, pull up the center of the red channel to get the reddish globally applied color, then pull down the center of the blue channel to get a yellowish color... which will give you that Red+Yellow=Orange cast. Once you have the color color cast that you like... then on the layer mask... have it be white at first to see what colors you are laying down...then... hit command or control " I " to Invert the white mask to become a black mask...which will make the globally applied orange color cast instantly disappear for just a minute. NOW... on this black layer mask... select it... and then paint on the image with a small, soft, 7% opacity white brush. Draw in the new orange tones where ever you want to place them...and however strong you want them to look. Paint with white to reveal the orange color cast... and paint with black to erase the effect. In your first example Link... there were several examples where there was an orange tonality change made to the edge of the legs, arms and neck areas, for example. On your second Link... there were several images I observed several images where the overall contrast of the image was brought down from purest black... to some slightly lighter shade of black. This has the effect of reducing the visual contrast of the image. You can achieve this particular lower contrast level look by using a levels adjustment layer...and sliding the right hand bottom slider to the left slightly. Move this bottom right slider from 255 to maybe 245 for one effect of reducing the tonal range slightly (it reduces the white tonality)... and then you could also try to move the bottom left slider to the right some...from 0 to maybe 5 or so...to get another kind of reduced contrast look... where the black becomes a little less black. You could also get some other interesting modern looks by doing this kind of adjustment on the red and blue channels in the levels properties panel, for example. This one of maybe 6 different ways to skin a cat in Photoshop. I like "adjustment layers" the most for their ability to be totally clear and transparent, never covering over any image pixels (unlike opaque painting) , and always being totally adjustable again and again without time or workflow penalty, and the most powerful reason of all... the ability to SELECTIVELY paint in the effects artistically... where ever you want... however strong you want! Cheers, Feb 08 17 02:27 am Link |