Forums > Digital Art and Retouching > How To Get: Deep Silver B&W Skin Tones Like These?

Photographer

Kane

Posts: 1647

London, England, United Kingdom

All images by Jorden Keith.

Any tips would be most welcome, looking more at post than lighting etc.  Thanks in advance
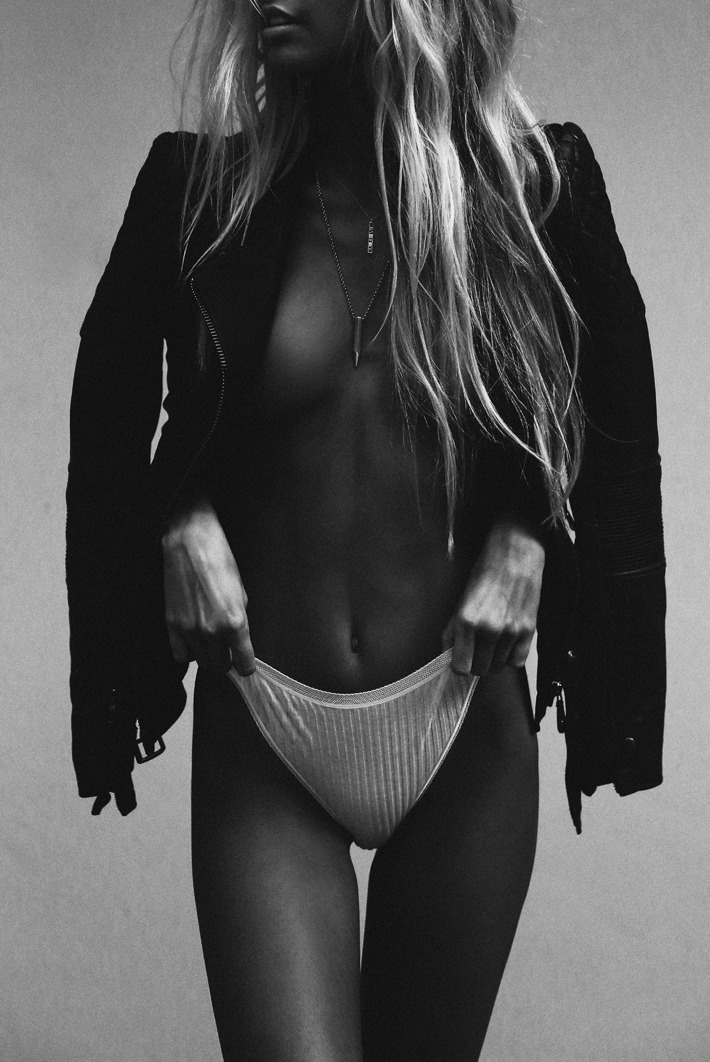
 smile

https://format-com-cld-res.cloudinary.com/image/private/s--S880S4ao--/c_limit,g_center,h_65535,w_550/a_auto,fl_keep_iptc.progressive,q_95/v1/e407ac9715f7f6478d6c40092c7b2d5b/IMG_6804B.jpg?550

https://s-media-cache-ak0.pinimg.com/564x/8f/2f/c0/8f2fc07d2a239eaf700770dfd3fe6993.jpg

https://66.media.tumblr.com/bf9ed9a847bc85a05f8b9d44e6b5e278/tumblr_nzzpdrnRuM1tzx8h5o1_1280.jpg

https://66.media.tumblr.com/985c9c605e477ff902200794d50cc847/tumblr_nq8kw5zEcO1uvpu6ho2_1280.jpg

https://s-media-cache-ak0.pinimg.com/736x/0e/f9/72/0ef972d00e15f93d0119d463ce9c2094.jpg

Oct 17 16 02:33 pm Link

Photographer

P R E S T O N

Posts: 2603

Birmingham, England, United Kingdom

Have you tried isolating the green chanel?

Oct 17 16 02:56 pm Link

Retoucher

3869283

Posts: 1464

Sofia, Sofija grad, Bulgaria

K I M I L Y wrote:
Have you tried isolating the green chanel?

Rather the blue one. Looking at his other pics the sky is pretty white.

Oct 17 16 03:08 pm Link

Photographer

Kane

Posts: 1647

London, England, United Kingdom

K I M I L Y wrote:
Have you tried isolating the green chanel?

Thanks for the reply.  Not sure I follow.  Do you mean bring a copy of the green channel into the layers panel?  If so, what then?

Oct 17 16 03:15 pm Link

Photographer

P R E S T O N

Posts: 2603

Birmingham, England, United Kingdom

kane wrote:
Thanks for the reply.  Not sure I follow.  Do you mean bring a copy of the green channel into the layers panel?  If so, what then?

Add a channel mixer adjustment layer then select only the green channel in the channels pallette. In the channel mixer select the green output channel and adjust red, green and blue until you get something approaching what you're after.

It works similarly for other channels, including blue. Try them both and see which works best for your particular image.

https://www.kimilyphoto.com/public/erika.jpg

Oct 17 16 03:21 pm Link

Retoucher

3869283

Posts: 1464

Sofia, Sofija grad, Bulgaria

or

Black & White adjustment layer
Preset: Blue Filter
and adjust to taste

Oct 17 16 03:42 pm Link

Photographer

thiswayup

Posts: 1136

Runcorn, England, United Kingdom

There are lots of ways. The simplest is download the Nik Efex collection and use silver efex.

I do my own versions by hand - it's a combination of yag effect and the correct sharpening, sometimes with a selective tweak in colour balance after bw conversion to make shadows colder and highlights warmer. Eg

https://www.flickr.com/photos/145139686 … 990564064/

..Just saying "Do X and adjust" isn't very useful. What you've got know is what you're adjusting for - which is the impression of specular highlights. Without apparent specular reflection, you don't get anything the brain will perceive as metallic. That's why sharpening to pick out fine detail can be useful and yag even more so.

Oct 17 16 04:21 pm Link

Photographer

Kane

Posts: 1647

London, England, United Kingdom

K I M I L Y wrote:

Add a channel mixer adjustment layer then select only the green channel in the channels pallette. In the channel mixer select the green output channel and adjust red, green and blue until you get something approaching what you're after.

It works similarly for other channels, including blue. Try them both and see which works best for your particular image.

https://www.kimilyphoto.com/public/erika.jpg

Awesome, thanks a lot!

Oct 18 16 02:13 am Link

Photographer

Kane

Posts: 1647

London, England, United Kingdom

anchev wrote:
or

Black & White adjustment layer
Preset: Blue Filter
and adjust to taste

Thanks, will give this a try smile

ETA:  Having some decent results, thanks again!

Oct 18 16 02:15 am Link

Photographer

Kane

Posts: 1647

London, England, United Kingdom

thiswayup wrote:
There are lots of ways. The simplest is download the Nik Efex collection and use silver efex.

I do my own versions by hand - it's a combination of yag effect and the correct sharpening, sometimes with a selective tweak in colour balance after bw conversion to make shadows colder and highlights warmer. Eg

https://www.flickr.com/photos/145139686 … 990564064/

..Just saying "Do X and adjust" isn't very useful. What you've got know is what you're adjusting for - which is the impression of specular highlights. Without apparent specular reflection, you don't get anything the brain will perceive as metallic. That's why sharpening to pick out fine detail can be useful and yag even more so.

Thanks for this, a HP filter is helping.  You lost me at yag effect though and google isn't helping much other than a flickr page with a dead link.

Oct 18 16 02:44 am Link

Photographer

thiswayup

Posts: 1136

Runcorn, England, United Kingdom

I think that flickr page explains everything you need to get more- yag is glow effect available in gmic, so

https://www.google.co.uk/search?q=yag+g … p;ie=UTF-8

..The useful thing about yag is that if you put on a bw image it ups contrast and emphasises small details, which is what you need to fake specular reflection. It's just one way of doing that though - the big thing to understand is that you want to make it look as if the "paper" the image is on contains reflective metallic elements, and that's done by creating tiny highlights.

But try Nik Efex Silver - it's free and less hassle!

Oct 18 16 07:53 am Link

Photographer

thiswayup

Posts: 1136

Runcorn, England, United Kingdom

kane wrote:

Thanks for this, a HP filter is helping.  You lost me at yag effect though and google isn't helping much other than a flickr page with a dead link.

Just download Nik Efex; that's the easy way. Yag is a glow effect

Oct 18 16 07:53 am Link

Retoucher

Lacroix-Retouch

Posts: 45

Zurich, Zurich, Switzerland

Yeah blue filter. I never would have given away this trick lol.

Oct 18 16 08:11 am Link

Retoucher

3869283

Posts: 1464

Sofia, Sofija grad, Bulgaria

Budhi Malu wrote:
Yeah blue filter. I never would have given away this trick lol.

Not a trick at all. Blue/cyan is simply opposite to skin tone in color space. So it makes sense to be the channel which gives highest contrast to skin. Unfortunately it is usually the noisiest one too but with proper exposure that should not be an issue. Lens filters can help.

Oct 18 16 08:21 am Link

Retoucher

Lacroix-Retouch

Posts: 45

Zurich, Zurich, Switzerland

anchev wrote:

Not a trick at all. Blue/cyan is simply opposite to skin tone in color space. So it makes sense to be the channel which gives highest contrast to skin. Unfortunately it is usually the noisiest one too but with proper exposure that should not be an issue. Lens filters can help.

Yeah true about the noise.

Oct 18 16 08:24 am Link

Retoucher

VigarLunaris

Posts: 125

Hanover, Lower Saxony, Germany

Well i love to see the noise -- because seems to be taken in b&w wink

Oct 18 16 10:54 am Link