|
Forums >
Digital Art and Retouching >
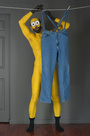
Bronze tone
Hello there, Has someone any idea how to achieve this tone? Thank you!  Oct 04 16 03:49 pm Link Her skin is actually covered with some shiny bronze, so that comes from the raw file. To tone it differently you can select the skin and manipulate the color hues and contrast in the direction you want. You can use curves, selective color or other tools. Oct 05 16 12:35 am Link From a retouching perspective: Colors like this can be non-destructively created using curve or level adjustment layers in Photoshop. These adjustment layers are transparent and do not cover over skin pores, they can be selectively painted anywhere on the image however strong you want them to be by inverting the white layer mask to a black mask and then painting with a white brush where you want the color. In levels or curves...you can create this color by pulling down on the green channel to get the base magenta color, by adjusting the red channel to get the desired shade of warmness and saturation, and possibly by pulling up or down on the blue channel curve to get a small bit of yellow or coolness to the color depending on the underlying fleshtones. You might want to simultaneously also pull up or down on the RGB channel so set the proper amount of lightness and darkness required for the color. You must understand that the the underlying original image has a LOT to do with how a particular look comes out in the end. If you had a person with different kinds of levels of skin tones and highlights in different places... you would not be able to duplicate the exact look you see here in the example. You could get get the same Intent, or a Similar very close look, depending on the characteristics of your base image. These adjustment layers are "totally adjustable" in real-time to create any color or any degree of luminosity without blocking up the skin pores... trouble is...they are pure transparent colors...and the base image contributes to the overall combined look. So, if your model has slightly lighter or darker skin characteristics... you can get the intent of this look here that you are looking for...but each original photograph is different.... so your results could also be a bit different. Its up to you the artist... to make artistically pleasing end images using your own judgements and tools and background images. I also agree with the above posters makeup concept. It is also possible to "Help this Look along... and get this kind of baseline look"... in front of the camera. You would use some "Shiny Metallic Bronzer Powder" strategically placed on certain zones of the models body. You would also want to light it well, and then later touch up in Photoshop to manage the final placement, cleanup, spread, and then choose the exact color tones... to make it ll come together. In the original image concept that you are asking about... the original model and her skin is important, the lighting is important, the makeup is important, the capture is important, and the post production is also important...to make all the elements come together as hoped and visualized. Its all "One large ball of integrated elements" that makes up a Final HQ Look like this. You gotta manage 4 to 5 factors correctly... in both pre production and in post production as well... if you want this "Exact Type" of Look. Best of Luck Oct 05 16 09:05 am Link Oct 12 16 06:06 pm Link |