|
Forums >
Digital Art and Retouching >
Help getting a look in Lightroom
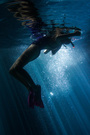
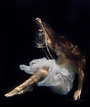
I have a shoot coming up and I have a specific look in mind that I'd like to try to achieve when it comes time to grade. I'm a filmmaker by trade so I'm not a wiz with Lightroom or photoshop. I'd prefer to stay in Lightroom for this part of the process for efficacy sake.  If anyone has advice I'd greatly appreciate it. If this look has a common name or if there is terminology that could be used to describe it or pertinent keywords I can google for more info on this look that would be just as useful. I'm also not above buying a LR preset with this look so I can reverse engineer it for my own edification. So feel free to point me to a preset or the right keywords to use to sift through the thousands and thousands of them. I understand that this look does not appeal to everyone. But, for better or worse, this is what I have in mind. Thanks! Mar 14 16 05:29 pm Link Hi Carlitos. I am not sure this can be done by using LR only but I can try to do it and send you the preset if you send me a similar raw file of yours (you can do it in PM if you will). I may even create a LUT file, so you can batch process your images. If you want to play yourself: what I see in this image is that it is desaturated, low contrast in the blacks and higher contrast in the lights (perhaps a steep curve applied) and the red/magenta is greatly reduced. Overall slightly greenish/yellowish tint in the whites. Mar 15 16 01:23 am Link Thanks Anchev. I thought the photographer that took the example photo mentioned that he used LR exclusively but I could be mistaken. Could you pm me rate info for that? Would that be a 3D LUT in .cube format? That would make it possible to use it in video/film grading software as well. I will definitely send you an image after the shoot. I am going to try it myself as well. Mar 15 16 01:49 pm Link Also looks like some very "crispy" lighting...perhaps an almost cloudless sky (enough for a few white puffy ones in the background, but you'd have to wait for the sun to not pass through a cloud on its way to your subject) somewhere between 11:00am and 1:00pm (assuming the sun is high at noon where you are), probably "close" to the Equator (can't do this in Seattle, Chicago, NYC, etc.), and the sun is behind your subject and to the right (as seen by the short shadows falling near&left from the rocks). The light is perhaps no larger than a silver beauty dish (or smaller reflector attachment), high, on the same _side_ as the sun (to make one side of the model totally shadowed) but in front of the model (to oppose the sun on that particular side). Although a small relative source, there's probably some diffusion material on the light, as evidenced by the soft edges of the shadow on the hand and posterior. Probably also a grid, as it's not spilling far enough to brighten the near sand. Mar 15 16 02:43 pm Link Interesting petemplinphoto. It is very crisp light. I would have said beauty dish too. But, this particular photographer uses only natural/available light. I'm going to guess that this is the gold or silver side of a reflector, high, camera right at about 45 degrees directed at the models face. They got "lucky" and caught a piece of her bum. He usually doesn't even use a reflector. The rest of this series of photos is clearly only natural light but I don't see where that's possible in this shot. You're right it is Los Angeles and not Seattle lol. Mar 15 16 04:10 pm Link I don't think this is a shadow from a beauty dish:  More likely a direct flash with no modifier. Anyway - nice astronomical insight  Mar 15 16 04:20 pm Link "Shooting Dark"....I like to call it "Dark Light"....I would imagine you could achieve it in lightroom, but that would be difficult to make it look like that. Better to make everything darkish in your camera, then play with the light to get your look as close as possible. You'll have 80% of the work done that way. If you want some inspiration, Google the work of Kesler Tran. Not sure if he invented the look, but I think he's probably the best at doing it. He's very innovative with light. Mar 15 16 08:57 pm Link Thanks for the advice Eyesso. That photo is actually from Kesler Tran. He is doing that look better than anyone else in my opinion. Mar 16 16 12:08 am Link Eyesso wrote: Never ever underexpose. This will not give you 80% of the work done but rather 200% of the noise + reduced raw data to work with. The signal to noise ratio is much much lower in the darker parts of the image. It is really not possible to make quality retouching or color grading if the image data which is to be modified simply isn't there. Mar 16 16 02:45 am Link anchev wrote: Adjusting to life in Seattle...sun is never high here.Ever. Mar 16 16 11:41 am Link This is a cool look. You should keep the Info window open in Photoshop for quick reference when working with color. I would say try boosting cyan a bit to get the harder, less vibrant skin tone, then boost yellow to get the golden tan tone. The overall brightness of the photo has been reduced by at least a stop. Mar 16 16 04:31 pm Link That's a good call on the light Anchev. I hate to copy someone else's work element for element but I'm absolutely going to have to try a couple bare, off camera flash. Mar 16 16 11:03 pm Link In Lightroom develope settings go to camera calibration/ blue primary and pull the saturation down to -70 Push vibrance up +30 and pull saturation down -30 Push general contast way up and depending on your original exposure, pull exposure down to taste This will give you a good starting point to the tone in your example After you can play with HSL and red and yellow saturations and color temp to find just what you are looking for. The camera cal blue primary and exposure both down is giving the skin tone in your example Mar 22 16 04:24 am Link The image has a "dirty" look that comes from cranking up the clarity too far, so that is where I would start. It is hard to see much beyond that without seeing a before and after comparison on your demo image. Mar 22 16 06:21 pm Link Thanks to Forms and everyone else. This is all great information. Mar 26 16 02:19 am Link |