|
Forums >
Digital Art and Retouching >
this look.. how???
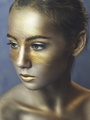
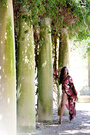
http://www.mymodernmet.com/profiles/blo … -portraits i tried the look by decreasing blues and increasing red in shadows.. but i am not able to achieve this.. Feb 20 16 10:53 am Link Its much more than that. Those leaves are desaturated in comparison to the subject. Its nothing to do with color in shadows/highlights. First try to layer mask the background, decrease saturation there while leaving subject intact, and than play with the color of the subject and background separately, try to give that teal color to the leaves. Feb 20 16 11:45 am Link Looks to me like there is some desaturation going on and a vignette added around the edges for drama. Might have a slight boost in the curves on the red. I'm not sure if its showing up the same on your computer but this is how I see it on my computer screen. Feb 20 16 11:56 am Link thanks.. will experiment..  Feb 21 16 08:35 am Link Yeah, heavy and selected desat, maybe, maybe a touch of sepia Feb 21 16 05:00 pm Link Strongly recommend to learn Color Theory. I also recommend these links that can help you understand why that look works and how to apply it visually : http://www.helpscout.net/blog/psychology-of-color/ http://www.johnpaulcaponigro.com/blog/c … ory-color/ [see all articles] http://www.worqx.com/color/color_proportion.htm [go through the tutorials] The recipe for the images though are just using Selective Color / Desaturation / Curves and masking where necessary by inverting the masks linked on the layers by painting with white to isolate sections. Buuuuutt you won't know what you're doing unless you learn what it all means. So learn first and then experiment later / as you go. Feb 25 16 04:50 am Link Do you specifically mean the skin color? This fashiony skin color effect is done by altering the red/cyan balance. Skin tends to look warm compared to these examples. Nikon cameras especially want to push skintones in warmer directions. The skintones here are very neutral compared to their original color. Remember that cyan complements red, and will neutralize it depending how much you increase it with respect to the amount of red in an image. Golden tones (red+green) are neutralized by blue. But you will have to curve your adjustments to get satisfactory results in all the exposure zones in the skin areas. Once you've figured out what you want to do with the subject's skin you can proceed to other issues, like what to do with foliage, etc. Feb 25 16 06:26 pm Link |