|
Forums >
Digital Art and Retouching >
How to achieve this skintone
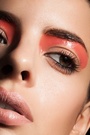
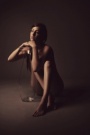
Hi guys! Can someone explain to me how can I achieve this skin tone? I'm a newbie when it comes to color in Photoshop. Appreciate the help!   Jan 27 16 03:51 am Link It looks like they pumped up the hue/saturation. After looking at your portfolio, not sure why you would want to do that, your work is beautiful. Jan 27 16 04:17 am Link Mary Durante Youtt wrote: Thank you for the kind words, Mary! Jan 27 16 08:27 am Link There are several ways in PS to add warmth. Make a duplicate layer (on top of the original) and tweak the warmth with any method until you get what you want. Just concentrate on the skin tone. Of course everything else in the image will also get warmer, which is not what you want. So add a layer mask to this duplicate and carefully uncover the stuff underneath in the original layer (with a black brush) that you don't want to be warmed up. I assume you know about layer masks. Of course the brush method is not the only way to add black to a layer mask. Anyway, that's what I'd do for a first try. :-) Jan 27 16 02:09 pm Link create color balance adjustment layer, add more red in the shadows and midtones (your reference picture looks a bit reddish) Jan 27 16 03:30 pm Link Easiest would be to use Topaz Restyle. This should get you close: Select Fashion > Rusted Grunge > Opacity 60% > Temperture 0.25 > Midtones 0.25 > White Level -0.25 > Structure 0.20 Another option is to use Alien Skin Exposure 10 (Which I prefer, fwiw.): Presets > Golden Hour - Orange Most > Overall Intensity 90 > Clarity 35 > Vibrance 5 > Saturation 15 > Color Saturation: Yellow 15 and Greens 30 Jan 27 16 07:52 pm Link They dumped a bunch of yellow on it. Jan 29 16 12:24 pm Link Mary Durante Youtt wrote: I Agree! Jan 29 16 01:48 pm Link Mary Durante Youtt wrote: Because this type of retouching and mainly the colour knowledge applied on this image will give you lots and lots of money!! Is that a good reason? :-) Jan 31 16 03:08 pm Link Assuming you've got a base image that's somewhat similar: Duplicate layer > change blend mode to Multiply -bring down opacity to around 40%-55% New Selective Color Layer > In Reds, bring down Cyan to around 20% and bring up Yellows 10% New Fill Layer by going to Layer > select New Fill Layer > choose a burnt orange color ( "around" 9a3b02 ) > change Blend Mode to Screen -lower opacity to around 10% This will get you in the neighborhood, but you'll have to tweak those layers to taste. Jan 31 16 05:31 pm Link Mary Durante Youtt wrote: Agree: You work look much better! Feb 01 16 06:10 am Link NYC fine art nudes wrote: I just tried this with some of my own photos, and while I had to tweak the numbers a bit (since I had a more saturated photo), I *really* liked the results. Feb 02 16 06:27 am Link I totally agree with Alena's curiosity to learn new techniques and experiment with different "looks". I personally want to learn everything i can about my craft. I'm disappointed with all your comments encouraging her not to change. Not to question other ideas. In support of her interest in learning this "look", especially for a retoucher, she would have a broader range of skills and possibilities to offer her clients. Please don't tell her to stay the same. That's boring. Feb 10 16 01:17 pm Link |