|
Forums >
Digital Art and Retouching >
Warm/Cool Look
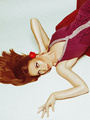
I was recently inspired by these images: http://www.henrikadamsen.com/202261/217 … 28video%29 If you see the video, these were obviously done in-camera, but I was wondering how to imitate it in post. Here is how far I have gotten by playing around with gradient, color balance, and photo filters, with some noise added:  I was wanting to find out if anyone else had any ideas on how to get this look. Thanks! Aug 19 15 01:40 am Link In the video world they use video overlays on a track above the video clip. Its often done in post production so it can be totally controlled. They use a blend mode with the effect to make the colors translucent or see through...blending modes like overlay, or soft light, or linear light , or maybe even multiply for the darker ones. A company like www.digitaljuice.com sells quite a few overlay effects like this...they are different colors and they are usually animated and not static. They call them light leaks, or overlays, or tints sometimes. You can produce similar results in still images by using the desired colors applied on a separate clear transparent layer in Photoshop... using a large soft, very low opacity brush put into the "color mode" (The NORMAL blending mode in the main top menu... produces an opaque kind of look...other blending modes in the brush itself help the look become more transparent). Also, place that clear transparent layer into a color or other blending mode also in additionto the brush blending mode. You can experiment with overlay, or softlight, add, multiply blending modes etc. You can play around with different colors, blends, swipes, corner paintings, or area painting in that transparent layer...till you get something that you like. If you want non-destructive, totally adjustable, always easily changeable effects like this... I like to use a curves adjustment layer. They are clean and clear effects...and can be totally adjusted in 6 different ways... and with the red, and green, and blue individual curves you can produce A N Y color you want... and interactively change your mind in real time easily. This allows you to try many visual options and see what you might like without destroying anything or visually trapping you if you dont like the first set of results. To do it: In this case you would take use the mask on the adjustment layer to paint in the color. You would do a control or command I to invert the white mask to make it a black mask first... to hide the colors...then... select and paint on the mask with a soft white very low 4% opacity brush to add the colors to your image. Once you get whatever colors you want by changing the different color channels in the curve (the individual color channels are located underneath the RGB Channel selection box. Choose a channel and drag the center of the curve up or down to see the colors it can produce). Besides any color... you still ALSO have the blending modes on that layer to further change the blending look... to what you might like better. And you also have the opacity slider to control the depth of the color effect until it looks artistically perfect This technique is Artistic and Experimental... and depends a lot on YOUR taste at the moment... and especially the nature and colors of the picture you are putting it onto. Some people like to use the complimentary or tertiary colors in the color wheel to choose their colors...these opposite color combinations often look very pretty together (blue/yellow, green/magenta, red/cyan for example). Your underlying image will contribute a lot of the creative clues to follow...and after that its whatever you see that you like. Good Luck... Aug 19 15 07:45 am Link Vicarious Photography wrote: It wasn't done in camera. It was done in post. Aug 20 15 07:23 am Link TMA Photo and Retouch wrote: Thanks so much, that helps a lot! Aug 20 15 04:44 pm Link |