|
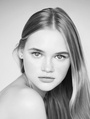
Hi All, I'm in the middle of retouching this image provided by Iulia David (for practice), and I'm struggling with the areas circled in green on her forehead.  I have already toned them down a fair bit from what they were, but I'd like to know - if faced with this circumstance, would you leave it as it is, or would you erase them completely? Would you say they're distracting, or natural? I have tried toning them down more with my limited knowledge, but they turn out very, very flat (which just doesn't look right). I've also been furiously going through Pinterest looking for good references, but I'm getting really confused! Many thanks in advance, and have a great day! :-) (edit: if this is in the wrong section, I'm sorry. I wasn't sure where to ask exactly.) Dec 12 21 12:54 am Link I would like to share my opinion with you: 1: You may be able to select the highlight of the forehead and restore some details by darkening or multiplying the bottom 2: I will also try to create a new blank layer and set the color mode to absorb the adjacent skin color to unify it 3: Balance the brightness of the surrounding skin color, so that others can focus on other places Mar 30 23 02:37 am Link Just dilute it a little, don't disappear completely For the method, please refer to the 1st floor Apr 13 23 04:38 am Link If I were to address the issue you mentioned, I would probably.... Select the highlight area on the forehead: Use a selection tool (e.g., Lasso, Magic Wand) to carefully outline the highlight on the forehead. Restore details by darkening or multiplying the bottom layer: Once the highlight area is selected, create a new layer and place it below the original image layer. Apply darkening or blending modes like "Multiply" to the new layer to bring back some lost details in the highlighted region. Create a new blank layer and set the color mode to absorb adjacent skin color: Create another new layer above the original image layer. Set the blending mode of this layer to a mode like "Color" or "Soft Light" to absorb the adjacent skin color and help unify the tones. Balance the brightness of the surrounding skin color: Adjust the opacity and brightness of the new layer created in step 3 until the surrounding skin color matches well with the highlighted area. This will help create a more natural and balanced look. Focus on other areas: With the highlight restored and the skin tone unified, viewers will be less distracted, and they can now focus on other important aspects of the image. Remember to always work on a duplicate of the original image or on separate layers, so you can easily adjust or revert changes if needed. Additionally, practice non-destructive editing by using adjustment layers and masks to retain the flexibility of your editing process. Aug 07 23 09:46 am Link |