|
Forums >
Digital Art and Retouching >
DAR Critiques >
Help a newbie? (removing hairs, color match etc)
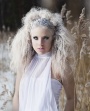
Hi! I took some photos today for practise and because I needed some new head shots. One of my problems I have is the weird/mismatched color on my chest/neck. I understand it's quite a common problem and there are many ways to correct it but I feel a little lost. In my case, which method would you use for best result and which would be the quickest? Also, I'm really struggling with the hairs sticking out. Trying to clone them but it feels impossible to do it without leaving traces, can't get a smooth transition between the cloned pieces and the original background. Lastly I feel a bit lost with the colors. Posting two variations here. Any other tips and tricks and links to good tutorials are very welcome too! I don't mind honest critique (otherwise I wouldn't use these forums!) but please keep in mind I'm a beginner. Thanks! Original colors:  Tried to give it a more autumny feel but don't know how it's working?:  Added some contrast and intensified the colors a little. Also used dodge on the eye that was a little darker and gave the lips a bit more color as well. Good or bad?  Sep 20 17 04:18 pm Link I am not an expert however in your case as usual color tone mismatch occurs. My quick way of tonal adjustment using sampling a particular area, averaging and then using curves adjustment gives very exact results. Moreover this is very equated way to match colors b/w two images. Sep 20 17 09:48 pm Link danish18 wrote: Than you, I will try that! Sep 21 17 03:45 am Link Well since you are new to photoshop, none of these tools I am going to recommend you look at are quick, by any means. I also might link too much info, but someone passing by might be some useful information seeing this post too. Ok, to start off with the most helpful free general retouching advice, I would go to these youtube channels right here. https://www.youtube.com/channel/UCY3Opl … OKtkBOkqiQ https://www.youtube.com/channel/UCwOtQl … RifVAJaxVQ https://www.youtube.com/channel/UCCdPuo … W3pCfHcoTA All of these channels have really good information about color grading, dodge and burning, and cloning/healing. To answer your main two questions, to remove stray hairs, blemishes, etc you can use the clone brush, healing brush, patch tool, and spot healing brush. For most cleanup work clone brush and healing brush is your best bet to use. As for dealing with uneven skin tone you can use the gradient map or the selective adjustment layer. There is a pretty good tutorial on fstoppers (https://fstoppers.com/education/gradien … olor-61864) which can help you a lot about how to use the gradient map to fix skin tone. Also, I would probably use the gradient map method as that is generally the fastest way to fix uneven skin tones imo. Selective color or curves adjustment layer can be used after the gradient map if you still need to. For you, this might be information overload looking at these tutorials, but retouching is not easy and it takes a lot of practice to even be halfway decent, mainly because the tools you have to use in photoshop maybe simple after you know what you are doing. However, when you are just starting out using these tools, it can be quite difficult to get the hang of. Sep 23 17 02:14 am Link clide wrote: Thank you so much for the links! i will try again after watching! The problem I had with cloning the hairs on this image is that the background is so irregular that I had troble finding good sources to clone from. Should I focus on the pattern and correct the colors after if they don't match? It wasn't too much info at all. Thanks again Sep 25 17 03:59 am Link Your welcome, glad I helped. The way the gradient map works is if you have certain parts of your body that have a different skin color it would fix it. For example, if your face and hand are different colors then the gradient map will fix it. They way you do this, is you create a gradient map, turn the opacity all the way down, the gradient map will have the layer mask selected so you need to select the gradient map that way you can select more colors than black and white, then select colors of the face (select a color of in the shadows, mid tones, highlights), turn the blend mode to hue instead of normal, turn the opacity up once you see the effect working, now go back and click the layer mask, press option (or alt if you use a PC) and I to invert the mask and paint the effect on where you want to apply it. And that's how you can use the gradient map to fix skin tone lol. Sep 25 17 06:06 pm Link Gradient map is solid because you define your highlight and shadow values, if you isolate through a channel (CPT Channel Power Tools Extension) is a cheap extension that allows you to select LAB RGB and CMYK channels all through a single color space. It comes in handy and is great for grabbing good cmyk values from rgb spaces (comes in handy daily for products etc..) anyway, Gradient Maps, Curves, Levels, etc.. you can use a myriad of quick ways to CC and average out those tones. I throw a solid color #ff0000 (255.0.0) Straight Red, over top on color mode and that will leave me with the remaining luminosity shift between the values. I can then balance the tonal values out and have that isolated from color. Then I usually switch the solid color layer from color mode to Luminosity and use that for reference in terms of the shift in color values. Aaron Nace and PHLEARN are good tutorials to take a look at. In terms of speed, I'd build confidence with learning at least a couple of different ways to achieve similar results with each thing you do, in the end the more you know and understand the better you'll be and more comfortable you'll become tackling every issue that arrises. Also, if you have wispy hair with a very wide aperture shot and a lot of creamy bokeh in the BG, I sometimes throw a stamp layer on top and use median on a low setting and it wipes away any pixel differentials that fall below the threshold of the setting, it also turns a lot of details into smooth surfaces, so make sure you utilize a layer mask and brush it in carefully where needed. If there is any texture needed after you can always sample a high frequency from the surrounding BG texture and lightly overlay or linear light place it on top of the wisp removal for near accurate detail. Have fun with it, and keep up the good work!!! Oct 13 17 07:52 pm Link |